Thursday, July 2, 2015

I am Back!

Hello Everybody,

First I would like to apologize for the long hiatus that I have taken from my blog.  The past few years have seemed like a crazy, out of control Roller-Coaster!

A brief (I cannot promise anything) explanation of the past few years goes as follows. It started with my husband deciding to start his own Locksmith business, this started the chain which meant moving approximately 90 miles away from the first home that we purchased together.  It started with him moving in with my parents, then my daughter and I followed short after.  During the time of living with my parents we received some pretty devastating news, I am unable to have any more children.  I was diagnosed with a condition called Premature Ovarian Insufficiency, which basically means that I will hit menopause faster than my body should.  With this news we also found out that conceiving my daughter (now 5 years old) was pretty much a miracle, this the pain of knowing that she will be our only child and we decided that we are going to make her life the best life possible (and spoil the daylights out of her).  The next event was making the move into our own place, a cute little rental to call our own.  Last September I changed jobs and with this current job I have a lot of freedom which I am incredibly grateful for.  Things are finally settling down, just in time for us to have made the decision to find a house to purchase. 

Now that things have settled down a little bit I am going to try to pay more attention to my blog and create more blog posts.  I will try to remember to take pictures of my projects and also take pictures of the project process so that I can add more tutorials to my blog.   My goal for this summer (since work is a little slow) is to try to create both blog posts but also create some "stock" for upcoming craft shows. 

Some things that you can look forward to include: Quilting, Sewing and Crocheting projects, along with children’s projects and recipes.


Thanks for stopping by!

Wednesday, April 17, 2013

Rag Quilt Tutorial

Receiving Blanket Rag Quilt Tutorial


First of all sorry for the delay in posting anything for so long! 

I finally managed to finish a project that I had been wanting to create for the longest time (about October of 2011)!  Not only did I finish it but I also managed to take the pictures necessary to create a tutorial for it, how did that happen? This project, Receiving Blanket Rag Quilt, is why I initially purchased my first sewing machine.  It was around October (2011) and I was searching for something special to do for my daughter for Christmas, by this time she was 1 and not using her receiving blankets anymore and they were just tucked away in a drawer.  I found a Rag Quilt Tutorial (ExpertVillage) and thought "this would be perfect for what I'm looking for!"  There are many other rag quilt tutorials out there on the web (check out my Pinterest page for other tutorials I have found) but this one sparked the interest, since seeing this tutorial I have looked up many others and tweeked them so I have my own way of doing things. 

Now before I decided to cut up all of my daughters receiving blankets I would go around to garage sales and look on Craigslist for receiving blankets.  I was only willing to pay $.25-$1 per blanket because they were test blankets and I was going to cut them up anyway.  Another thing I began doing was whenever JoAnn's had a pattern sale I would go stock up on fun patterns.  I probably over did it because there are some patterns that I have yet to even open, however I do have some pretty cool blanket and "kid/baby stuff" patterns. 

Through my Facebook Page- Quilting Creations you can see the previous rag quilts I made until I decided I had tweeked everything enough to where I could successfully make my daughters rag quilt.

Ok enough babbling, let's get to the tutorial!

Supplies:

  • Receiving Blankets
    • I used about 7-8
    • Cut into 6 1/2 inch squares
  • Backing
    • I used Minkee Dot (Soft and Comfy Dot at JoAnn's)
    • 2 3/4 Yd
  • Batting
    • I used the Flannel Batting on sale at JoAnn's
    • 3/4 Yd
  • Thread
    • At least 2-3 spools
  • General
    • Rotary Cutter and Mat
    • Needle
    • Spring Scissors- Make life so much easier while cutting and cutting and cutting some more!

Steps

  • Prewash all fabrics
    • I washed them with a "free" detergent without using any fabric softener.
  • Cut all fabrics
    • Receiving blankets: 6 1/2 x 6 1/2" squares
    • Backing: 6 1/2 x 6 1/2" squares
    • Batting: 4 1/2 x 4 1/2" squares
      • I cut batting smaller than the top and bottom squares because I did not want it to show in the seam allowances, and that would be easier on my hands when cutting also.  You very well could cut the batting the same size at the top and bottom squares though 
  • Assemble the quilt blocks
    • Layer Backing face down
    • Followed by a square of Batting
    • Next by a Blanket square face up


  • Sew and "X" through each square
  • Arrange your squares on a large surface to prepare the squares for rows
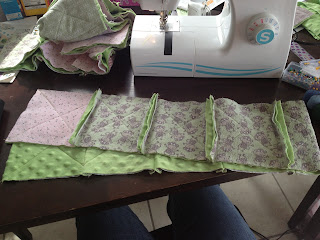
  • Pin and sew squares together with a 5/8" seam allowance
    • Pin the squares with the backs together
    • Here is where the Rag Quilt is unique and different- the seam allowances are placed on the outside/top of the blanket
 
  • Pin and sew rows together
    • Press the seam on top towards you and the bottom seam away so that the bottom seam runs smoothly through your machine


  • Next sew a border to close up the blanket
    • Along the top and bottom I laid both seam allowances down one way and along the sides of the blanket I spread out the seam allowances, but you can do whatever you want.

  • Now for the fun part: The Cutting
    • There are guidelines for the cutting but once I get to it I just cut, be careful though not to cut into any of the seams.
    • This is where the spring loaded scissors come in handy!
  • Once the cutting is finished, wash the blanket and it will fray beautifully! 
    • It's best to take it to a laundromat because of the lint and fabric strands.
    • The Minkee that I used doesn't really fray but it still makes for a comfy, beautiful blanket!
    • These quilts get softer and softer with each wash.
  • And here you have it!


A few little tidbits:
  • I did forget that Minkee has a nap so the back of the quilt isn't all one way but it doesn't change the comfy factor. :-)
  • Rag Quilts can be made of several different fabrics but I find that flannel works the best for the front and back.
  • These quilts do not always need batting, I made one with flannel back and demin (from old jeans) for the front and the denim made it heavy enough to be very warm. 
  • I do not recommend using the Ultra Cuddle fabric from JoAnn's, it just tends to fall apart and it shifts A LOT.
  • Rag Quilts can be made to all sizes and are very, very easy to customize without major math equations. :-)

This Rag Quilt makes for a fantastic keepsake for all of those receiving blankets that your child has outgrown.  They make a perfect toddler size blanket or lap quilt.  I am more than willing to create one of these beautiful keepsakes for you, please message me for cost and details!

Thanks for reading! 


Friday, September 14, 2012

Letters on a Canvas

When my daughter was born I wanted to do something really special in the nursery, we didn't really have a "theme" picked out and we kind of wanted to keep it simple.  Therefore I searched and searched online for ideas and finally came across a tree mural placed on a wall, and thought "oh I can do that," and started drawing, tracing and painting. This was the final product:
If anybody would like I could list the steps taken but this post is about a canvas idea that I got from pinterest (I did skip the fabric step) where I used the leftover paint from the tree to make a cute canvas. 
 

Materials Needed:

  • Canvas
  • Printer
  • Contact Paper
  • Xacto Knife
  • Acrylic Paint
  • Paint Brushes
The first thing I did was print out the letters, after printed I played with the enlargement feature to print out the letters to a good size.  Then I placed contact paper over the printed sheet of paper and used and Xacto knife to cut the letters out.

The same idea from a different project.
 
The next thing I did was place the letters on the canvas where I wanted them, then removed the backing and stuck them onto the canvas.  Once then were placed well I placed a black garbage bag on the floor, because I had my daughter help me and wanted to attempt to keep the mess to a minimum.  I placed the three paints (red, pink and purple) into cups and had three different brushes (to help my daughter to keep from mixing the paints before they made it to the canvas).  She helped me spread out the paints onto the canvas so there was no more white spots. 
Basically we used simple up and down strokes to cover the canvas and try to blend the paints. Once the canvas was dry I used the Xacto knife to help remove the letters off of the canvas.  Yes, some of the paint did leak under the letters but it simply adds character and shows its homemade. 
I felt that it needed something added to it so I took out the white acrylic paint and had Brianna dip her hands into the paint and made cute little handprints at the top of the canvas. And here is the final project:
I am sure that one day we will either move or need to paint over the tree therefore my intentions are to place a picture of the tree onto a canvas.  Then in her room place this finished handprint canvas on the wall next to the second canvas with a picture of the tree together.  I will remember to show how I get the picture of the tree onto the canvas when it gets done. 

Thanks for stopping by!

Friday, September 7, 2012

Baby Throw Quilt

Throw Size Baby Quilt

I have been working on a lot of projects lately and the one I am posting about today is the Throw Size Baby Quilt that I just finished for my cousin's new baby girl. 


This is how it started: My cousin had all of her friends and family send her an 8" piece of fabric to be created into a quilt.  I received everything from t-shirt pieces, dress pieces, cotton fabric, a hand-made doilie, ties and lots of other different types of fabrics; it totalled about 80 something pieces. 
The hardest part of the entire quilt was first trying to figure out just how I was going to piece this quilt together with so many different prints and styles of fabrics.  While looking through Pinterest (my favorite addiction) I found a quilt made of three different size squares and thought it was perfect! The change that I made was to place the smaller squares on the top and the bigger pieces on the bottom.  My next mission was to gather all the pieces and decide how to group the pieces together.  I did my best to group all of the pieces into groups of four to make it a little bit easier.  Some of the pieces were used once while others were used twice to make the quilt look more visually pleasing. 
After all of the pieces were grouped I had to decide which groups were going to be small, medium or large.  Once this was determined I could then begin my next step of cutting all the fabric pieces to the right size; 4.5", 7.5" and 14.5" squares.  When all the squares were cut I laid them out on my table to make sure that everything was in a good place, and if they weren't I just went ahead and rearranged them until I thought it looked good.  Once I was happy with the layout I started preparing the pieces that either needed applique or interfacing.  I had a square with a tie that needed to be stitched in place, as well as a couple badge pieces that needed to be stitched down as well.  Because I had some t-shirt and dress pieces they had to have lightweight fusible interfacing placed on the backside of the fabric to help stabilize the pieces.  My mother also contributed to the preparing of the quilt, she took one of the big pieces to her embroiderer and had the baby's initials and date of birth placed on a the square.
Now that all of the pieces were placed in a good position and prepared for stitching I was able to start piecing the top of the quilt. It was easiest for me to start with the small squares, therefore I went from top to bottom.  First I stitched the small groups of four together, ending up with 12- 4 square patches that started the first four rows of the quilt top. 
After the 4 square patches were complete I began stitching the top rows; combining the patches with the 7.5" squares.
When the first four rows were stitched I did the same with the medium squares; making 6- 4 square patches.
Then I stitched the rows; combining the 4 square patches with the 14.5" squares.
Once all the rows were complete, I then stitched all of the rows together to finish the quilt top.  When I finished putting the entire quilt top together I placed the hand-made doilie onto the lower large squares.  I used Heat 'n Bond to hold it in down then stitched it into place. 
The finished quilt top was 56"x70" which meant that I had to piece the backing horizontally because I could not find a cotton wide enough at my Joann Store.  My husband actually helped me pick out the backing fabric because there was so many options with the fact that there was no theme to the top that I couldn't decide what to get.  He picked a really pretty light pink with white leaves, I was very impressed :-). 
Once the back was pieced I laid a sheet on the floor and taped it tight, then laid the backing down and the batting on top of that.  I used a spray adhesive to hold the two pieces together and made sure there were no wrinkles and then laid down the quilt top; I used the spray adhesive to hold the top and batting together as well.  Due to the fact that I was trying free motion quilting I decided to do a little bit of pinning to be sure the layers would be held together. 
I made the decision to free motion quilt a little late so trying to find a darning foot that I didn't have to wait 7-10 days to receive was a little frustrating.  Thankfully a store in town carried a darning foot that fit my machine and was not overpriced.  Yay for me!  By way of Pinterest I found this Free Motion Quilting tutorial that helped me immensely.  I practiced a little bit on some scraps of fabric, the hardest part had to be getting my thread tension right so that the threads locked in the middle.  Once I found the right tension I took a deep breath and started on my quilt.  I was able to finish quilting in about 3 sittings, and I think it turned out pretty well for being my first free motion quilt (I really wish I would have taken a closeup of the quilting but you can kind of see it here).

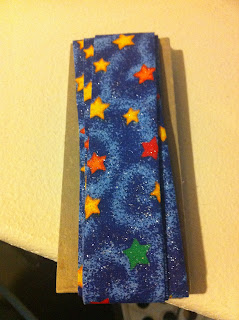
Once it was completely quilted I squared the quilt and got the binding started.  Somebody had sent a really nice night-time star print that I thought would be perfect for the binding since enough was sent.
I used a All-by-Machine quilt binding method.  Using a great Quilting Calculator app I figured out how many strips I needed to cut.  I prefer to do machine binding because I'm not great with hand sewing and I have the machine so why not use it.  After the binding was complete I washed the quilt in a "Free" detergent and used a "Free" softener in the dryer, since this is intended for a baby. 
And there you have it a Throw Size Baby Quilt:
Thanks for stopping by... see you again soon!


Monday, July 16, 2012

Lava Lamp

Today I decided to make a wannabe Lava Lamp with my daughter, Brianna, that I had found on the Disney Family Fun website.  During the summer I only work on the weekends so I decided that I really wanted to have little fun things that Brianna and I can do during the day.  Through my love of crafting I searched and searched for some cool activities, or as Brianna calls them "Amazing." The Disney Family Fun website had some really great ideas and that's where the Lava Lamp came from.

Materials needed include:

  • Clear Plastic Bottle
  • Vegetable Oil
  • Water
  • Food Coloring
  • Funnel (Helpful but not necessary)
  • Effervescent Antacid Tablets (Alka-Seltzer)

First thing first was cleaning the water bottle and taking the label off of the bottle, for a SmartWater waterbottle this was definitely a task! I peeled the label off of the bottle and found that there was a ton of adhesive leftover on the bottle so I tried to soak it in hot water and use dishsoap to remove the residue, this did not really work at all. 
After that failure I dug through my cabinets and found my ever so handy Goof Off.  Due to the odor I took the bottle outside, sprayed it down and let it sit for a few minutes.
The bottle soaked for a few minutes and I took it inside and cleaned it with soap and water, this was repeated twice.  Once the bottle was cleaned and dried we were able to begin with our project.

Steps:

  • Fill the bottle just over halfway with the Oil
That's my Ham :-)
  • Fill the bottle the rest of the way with water to about an inch from the Top
 
  • Add a few drops of Food Coloring
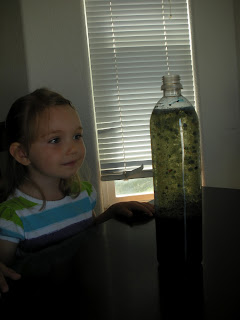
We got a little carried away and ended up with a dark Green
  • Break up and Antacid Tablet into 4 pieces and drop the pieces one at a time into the bottle and watch the magic


This was a picture that Brianna took, I have to say she did pretty good, lol:


When you are finished with your Lava Lamp simply let the bubbles settle and simply replace the bottle cap and place in a safe place.

What is also really great about this project is it can be reused to make waves in the bottle (demonstrating that water and oil truly do not mix)


Every once in a while Brianna sees the bottle and wants to see the "Amazing Bubbles." That's when we take the bottle to the table and break out the effervescent tablets and replay the Lava Lamp.  This fun little project also amazes some adults!  I hope you enjoy this project!


Thursday, June 14, 2012

Taco Seasoning

Have you ever been in the middle of cooking Tacos for dinner then realize you forgot the taco seasonings packet? Or your little one accidentally grabbed the packet and spilled the contents everywhere? Well the other day I was cooking dinner while waiting for my husband to come home and I had everything basically ready: the meat browned, the beans warm, the rice cooked (white rice with Cilantro Lime Rotel) and all I needed was my seasonings packet.  I looked in my spice cabinet and low and behold as I flip through all of my packets they are ALL gravy mixes!  That's when I began to freak out and called my husband who was finishing up a job for work and told him he may need to stop at the store, however by that time the meat would probably be overcooked and the rice and beans cold; so I thought let's look online and see if I cannot find a recipe quickly online and get lucky enough to have all the spices needed.  Sure enough I found one at allrecipes.com, and it was a complete lifesaver.  I scrambled through my spice cabinet and found everything I needed:
Ingredients:
  • 1 TB Chili Powder
  • 1/4 ts Garlic Powder
  • 1/4 ts Onion Powder
  • 1/4 ts Crushed Red Pepper Flakes
  • 1/4 ts Dried Oregano
  • 1/2 ts Paprika
  • 1 1/2 ts Ground Cumin
  • 1 ts Sea Salt
  • 1 ts Ground Black Pepper
*After reading some of the comments made I decided to add 2 TB of flour in with the rest of the ingredients

Directions (I added the last 4 step; similar to what you find on a package because that made most sense to me):
  • Combine all ingredients into a bowl and store in an airtight container (or use)
  • Brown, Drain and Rinse 1 Lb Chop Meat
  • In the pan add seasoning mixture with 2/3 Cup Water (according to a comment), mix well then add meat
  • Bring mixture to boil then reduce heat and simmer for approximately 4 minutes
  • Serve
I have used this recipe twice now, once in tacos and the next time in a Velveeta Nacho Bake.  The first time my husband LOVED it, however it was a little too spicy for myself and my 2 year old daughter.  Therefore the second time I decided to decrease the Chili powder, Paprika and Cumin (only slightly) and left out the Crush Red Pepper flakes, even with these changes it still had great flavor. 

I hope that this helps you as much as it helped me. Chances are I will never spend the money on a package of taco seasoning again, and it's a great way to reuse those old baby food jars!
Enjoy!

Thursday, June 7, 2012

Welcome

Welcome to my Blog!  Here you will find stories about my life, tutorials for sewing/quilting and fun activities for kiddos. 

My daughter, Brianna, has just turned 2 and she is as fun as can be!  Currenlty we are in the process of Potty Training so I may have a post regarding the trials and tribulations of the Potty Training experience (with managing the TMI, of course).  Some fun activities that I will post tutorials about are things like yesterday we made homemade finger paints together.  I have found some really incredible and fun projects to do with her so I plan of documenting them to share.   

In 2004, I moved to Greeley, Colorado and I graduated from UNC with a Bachelors of Science in Exercise Science: with emphasis in Athletic Training.  After graduating I did sit for the National Certification test, therefore I am nationally certified for Athletic Training.  During the summer I get to spend all week with my wonderful daughter, while over the weekends I work various sports tournaments as an Athletic Trainer. An awesome part of my summer is that I do get to work with my Dad, who is a soccer referee, which I think is pretty cool.  When schooltime hits I work as an Athletic Trainer at a high school, where I still get to spend the better part of my day raising my daughter. 

While living in Greeley, I graduated from UNC, got married (2007), had a little girl and found a great job.  I also picked up sewing/quilting this past year and have loved it!  It started by wanting to find a unique Christmas gift for my daughter, I stumbled across a blanket that was made of old recieving blankets and thought it was amazing. Over the summertime I found lots of old recieving blankets at garage sales so that I could practice before I decided to cut up all of Brianna's blankets.  Then last October my parents purchased a simple sewing machine and I have been on a mission to create wonderful pieces and find new things!  

My whole life I have loved to create things!  Everything from childhood bracelet making, decorating my entire wedding and painting my daughters room.  Sewing and quilting has fit perfectly into my life as well as creating fun projects with my 2 year old daughter.  Getting to create with my daughter, as well as for my daughter, is definitely the most rewarding part of my life, then comes creating gifts for my family including my new nephew and second cousins.   

I hope that you enjoy my blog and come back soon for some fun stuff, tutorials and more!