Receiving Blanket Rag Quilt Tutorial
First of all sorry for the delay in posting anything for so long!
I finally managed to finish a project that I had been wanting to create for the longest time (about October of 2011)! Not only did I finish it but I also managed to take the pictures necessary to create a tutorial for it, how did that happen? This project, Receiving Blanket Rag Quilt, is why I initially purchased my first sewing machine. It was around October (2011) and I was searching for something special to do for my daughter for Christmas, by this time she was 1 and not using her receiving blankets anymore and they were just tucked away in a drawer. I found a Rag Quilt Tutorial (ExpertVillage) and thought "this would be perfect for what I'm looking for!" There are many other rag quilt tutorials out there on the web (check out my Pinterest page for other tutorials I have found) but this one sparked the interest, since seeing this tutorial I have looked up many others and tweeked them so I have my own way of doing things.
Now before I decided to cut up all of my daughters receiving blankets I would go around to garage sales and look on Craigslist for receiving blankets. I was only willing to pay $.25-$1 per blanket because they were test blankets and I was going to cut them up anyway. Another thing I began doing was whenever JoAnn's had a pattern sale I would go stock up on fun patterns. I probably over did it because there are some patterns that I have yet to even open, however I do have some pretty cool blanket and "kid/baby stuff" patterns.
Through my Facebook Page- Quilting Creations you can see the previous rag quilts I made until I decided I had tweeked everything enough to where I could successfully make my daughters rag quilt.
Ok enough babbling, let's get to the tutorial!
Supplies:
- Receiving Blankets
- I used about 7-8
- Cut into 6 1/2 inch squares
- Backing
- I used Minkee Dot (Soft and Comfy Dot at JoAnn's)
- 2 3/4 Yd
- Batting
- I used the Flannel Batting on sale at JoAnn's
- 3/4 Yd
- Thread
- At least 2-3 spools
- General
- Rotary Cutter and Mat
- Needle
- Spring Scissors- Make life so much easier while cutting and cutting and cutting some more!
Steps
- Prewash all fabrics
- I washed them with a "free" detergent without using any fabric softener.
- Cut all fabrics
- Receiving blankets: 6 1/2 x 6 1/2" squares
- Backing: 6 1/2 x 6 1/2" squares
- Batting: 4 1/2 x 4 1/2" squares
- I cut batting smaller than the top and bottom squares because I did not want it to show in the seam allowances, and that would be easier on my hands when cutting also. You very well could cut the batting the same size at the top and bottom squares though
- Assemble the quilt blocks
- Layer Backing face down
- Followed by a square of Batting
- Next by a Blanket square face up
- Sew and "X" through each square
- Arrange your squares on a large surface to prepare the squares for rows
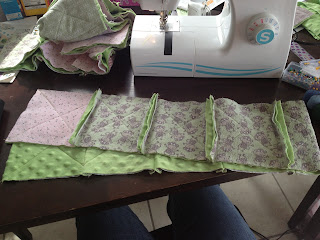
- Pin and sew squares together with a 5/8" seam allowance
- Pin the squares with the backs together
- Here is where the Rag Quilt is unique and different- the seam allowances are placed on the outside/top of the blanket
- Pin and sew rows together
- Press the seam on top towards you and the bottom seam away so that the bottom seam runs smoothly through your machine
- Next sew a border to close up the blanket
- Along the top and bottom I laid both seam allowances down one way and along the sides of the blanket I spread out the seam allowances, but you can do whatever you want.
- Now for the fun part: The Cutting
- There are guidelines for the cutting but once I get to it I just cut, be careful though not to cut into any of the seams.
- This is where the spring loaded scissors come in handy!
- Once the cutting is finished, wash the blanket and it will fray beautifully!
- It's best to take it to a laundromat because of the lint and fabric strands.
- The Minkee that I used doesn't really fray but it still makes for a comfy, beautiful blanket!
- These quilts get softer and softer with each wash.
- And here you have it!
A few little tidbits:
- I did forget that Minkee has a nap so the back of the quilt isn't all one way but it doesn't change the comfy factor. :-)
- Rag Quilts can be made of several different fabrics but I find that flannel works the best for the front and back.
- These quilts do not always need batting, I made one with flannel back and demin (from old jeans) for the front and the denim made it heavy enough to be very warm.
- I do not recommend using the Ultra Cuddle fabric from JoAnn's, it just tends to fall apart and it shifts A LOT.
- Rag Quilts can be made to all sizes and are very, very easy to customize without major math equations. :-)
This Rag Quilt makes for a fantastic keepsake for all of those receiving blankets that your child has outgrown. They make a perfect toddler size blanket or lap quilt. I am more than willing to create one of these beautiful keepsakes for you, please message me for cost and details!
Thanks for reading!


